

Using Home Assistant Time Machine to Back Up and Restore Dashboards

If you’ve ever broken a Lovelace view and wished for a quick “undo,” Home Assistant Time Machine is the safety net. It’s a lightweight web UI that reads your Home Assistant backups, lets you browse YAML (automations, scripts, ESPHome, packages, and especially dashboards), and restores individual files without rolling back your whole setup.
What you’ll get
- A standalone Time Machine container you can drop onto any utility host.
- Read/write access to your live HA config plus your backup folder so you can diff and restore safely.
- A turnkey workflow that keeps credentials in env vars instead of the UI.
Requirements
- Home Assistant with a working backup location (e.g., your snapshot folder or a NAS mount).
- Docker / Docker Compose on the host that can see your HA config and backups.
- A long-lived access token (LLAT) from Home Assistant (Profile > Create token).
Step 1: Create your env file
HOME_ASSISTANT_URL=http://your-ha-host:8123/
LONG_LIVED_ACCESS_TOKEN=pa_...your-token...
TZ=America/New_York
Keep this file private; the container will read these so the UI stays read-only for auth fields.
Step 2: Compose it
services:
  ha_time_machine:
    image: ghcr.io/saihgupr/homeassistanttimemachine:latest
    container_name: ha_time_machine
    restart: unless-stopped
    ports:
      - "54000:54000"
    environment:
      - TZ=${TZ}
      - HOME_ASSISTANT_URL=${HOME_ASSISTANT_URL}
      - LONG_LIVED_ACCESS_TOKEN=${LONG_LIVED_ACCESS_TOKEN}
    volumes:
      - /path/to/homeassistant/config:/config
      - /path/to/homeassistant/backups:/media/timemachine
      - ./ha_time_machine/data:/data
/config: your live HA config (needs write access for restores)./media/timemachine: wherever your HA backups live./data: bind-mount so your regular backups (e.g., Duplicati) capture app metadata.- Change
54000:54000if you need a different port.
Step 3: Start it
docker compose up -d ha_time_machine
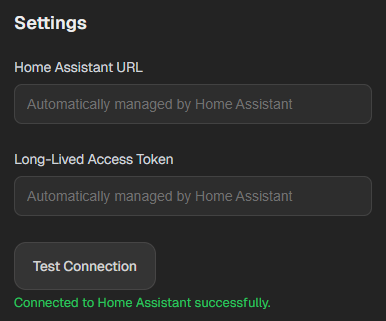
Step 4: First-run in the UI
- Visit
http://your-docker-host:54000. - HA URL and token should appear read-only (pulled from env).
- Paths: Config
/config, Backups/media/timemachine. - Click Test Connection, then Backup Now to verify a snapshot lands under your backup tree (YYYY/MM/timestamp).
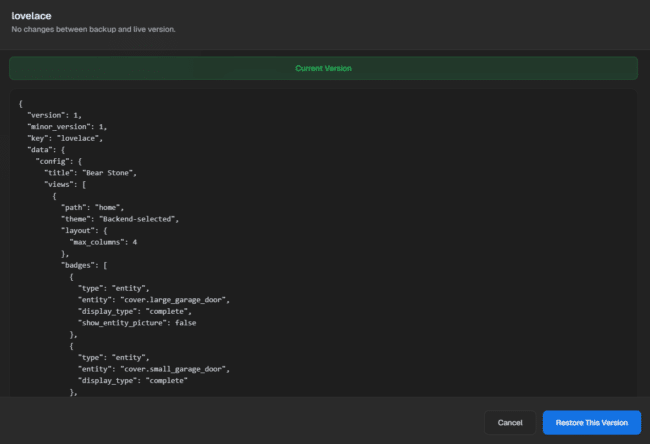
Restore or share a dashboard
- UI path: Lovelace → pick a dashboard → view diff → Restore. A safety copy is made before writing.
- To share: copy the YAML from the backup view—no need to ship the entire config.
Why pair it with your regular backups?
Duplicati (or any off-box backup) is great for long-term retention. Time Machine is for surgical restores and quick code sharing. They complement each other.
Optional niceties
- Add a launcher in your dashboard tool (Dashy, Homer) pointing to the Time Machine URL.

Tips for a smooth ride
- If your backups live on a NAS, make sure the host mounts it before starting the container.
- Skim the diff view before restoring to avoid overwriting newer changes.
That’s it—one container, mapped to your config and backups, and you get a two-click “oops recovery” for Lovelace (and the rest of your HA YAML).
Happy Automating!
-Carlo