

How to extend your Pi-Hole Ad protection beyond your own LAN
Explore how to extend Pi-Hole ad protection beyond home, leverage WireGuard VPN for mobile device management, & set up Docker-based network security.

The Problem
As my kids have grown, I’ve found that I no longer require the parental controls offered by Circle. In fact, Circle has increasingly become a bottleneck in my environment. However, I still want to provide the benefits of privacy, ad blocking, and generalized filtering that my Pi-Hole offers. Previously, with Circle, all mobile phones were routed back through a VPN tunnel to our home’s main LAN to enforce parental controls. This worked seamlessly, whether we were using LTE, Wi-Fi networks outside of our home, or anything in between. I now needed to recreate this solution that I was receiving from the Circle device.
My search for a suitable solution led me into the complex world of Mobile Device Management (MDM) and Virtual Private Networks (VPNs). Unfortunately, I couldn’t find a cost-effective MDM solution for families, particularly since we use iPhones, which require an Apple Certificate to manage (this involves annual costs). Therefore, a VPN seemed like my only viable option.
Functionally, I wanted a very simple solution that would work like this:
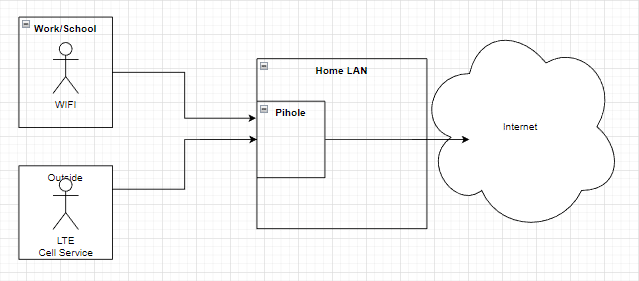
Regardless of the user’s location, they would benefit from PiHole’s protection, including ad-blocking, malware prevention, and phishing protection.

WireGuard VPN
After much research, I discovered WireGuard VPN, a free, open-source solution that conveniently comes in a Docker container. Since my entire infrastructure is Docker-based, this seemed like the perfect fit.
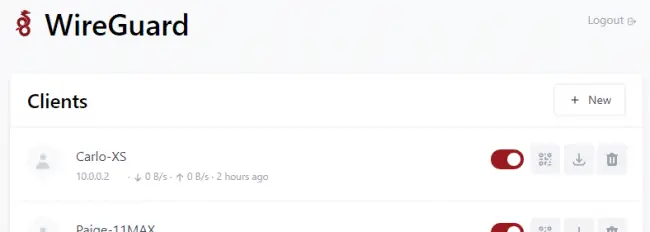
Digging deeper into WireGuard, I stumbled upon another project called WireGuard Easy. This provided the lightweight CLI VPN with a user-friendly interface for adding clients and tracking usage.
By employing a working WireGuard solution, I could install the client on all mobile endpoints. These would connect back to my server instance on my Docker container, with WireGuard directing all endpoints to use the PiHole on my local LAN for comprehensive adware/malware protection.
A critical aspect that made this process smooth was iOS’s On Demand VPN functionality. I could set up each WireGuard Client to activate or deactivate protection based on whether the device was connected to our home’s internal SSIDs. As soon as a device left our Wi-Fi network, the VPN functionality would kick in. Conversely, upon returning home, the VPN would deactivate, since protection was already locally defined via the DHCP scope.
DHCP and Docker Subnetting
I did encounter a few challenges when configuring the networking for the WireGuard and PiHole containers. I’ll skip detailing the trial and error phase and go straight to my final configuration.
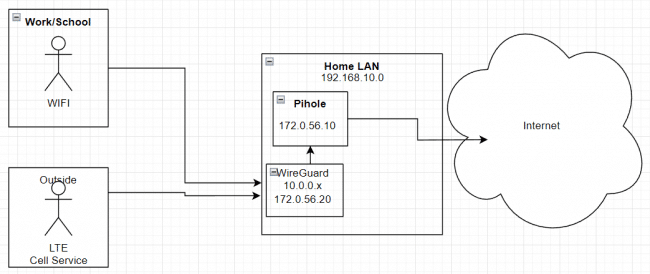
Interestingly, this design does not route ALL traffic through the internal VPN, but only the DNS requests. This offers the desired domain blocking protection for all devices without forcing a throughput bottleneck through WireGuard.
When I moved the PiHole and WireGuard containers to a 172.0.56.x network, I faced a minor hiccup. As my PiHole also serves DHCP addresses to my network, I needed to introduce a DHCP helper to the 192.168.10.x network to forward requests.
The Solution
Here is the Docker-Compose entry for the DHCPHelper. With one line (IP:), you point the container back to your PiHole instance.
  dhcphelper:
    restart: unless-stopped
    container_name: dhcphelper
    network_mode: "host"
    image: homeall/dhcphelper:latest
    environment:
      IP: '172.0.56.10'
      TZ: America/New_York
    cap_add:
      - NET_ADMIN
Here is the Docker-Compose entry for my PiHole:
  pihole:
    container_name: pihole
    image: pihole/pihole:latest
    environment:
      - TZ=America/New_York

    ports:
      - "53:53/tcp"
      - "53:53/udp"
      - "80:80/tcp"
    volumes:
      - './etc-pihole:/etc/pihole'
      - './etc-dnsmasq.d:/etc/dnsmasq.d'
      - /etc/localtime:/etc/localtime:ro
    cap_add:
      - NET_ADMIN
    restart: always
    depends_on:
      - dhcphelper
    networks:
      backend:
        ipv4_address: '172.0.56.10'
and here is the Docker-Compose entry for the WireGuard Easy container:
  wg-easy:
    environment:
      - WG_HOST=wireguard.fordst.com

      - WG_DEFAULT_DNS=172.0.56.10
      - WG_DEFAULT_ADDRESS=10.0.0.x
      - WG_ALLOWED_IPS=10.0.0.0/24, 172.0.56.10/32
    image: weejewel/wg-easy
    container_name: wg-easy
    volumes:
      - ./wireguard:/etc/wireguard
    ports:
      - 51820:51820/udp
      - 51821:51821/tcp
    restart: unless-stopped
    cap_add:
      - NET_ADMIN
      - SYS_MODULE
    sysctls:
      - net.ipv4.ip_forward=1
      - net.ipv4.conf.all.src_valid_mark=1
    depends_on:
      - pihole
    networks:
      backend:
        ipv4_address: '172.0.56.20'
The backend network is defined here:
networks:
  backend:
    ipam:
      config:
        - subnet: 172.0.56.0/24
In conclusion, the solution I’ve outlined above has served my requirements well. It enables privacy, ad-blocking, and malware protection for my family’s iPhones, whether we’re at home or on the go. It leverages the capabilities of WireGuard VPN, WireGuard Easy, and PiHole in a Docker-based environment, with additional refinement through iOS’s On-Demand VPN functionality.
This solution is currently serving my family and I hope this guide helps those of you searching for a similar solution.
Happy Surfing!
CARLO